LAN option #
I won’t duplicate the information originally posted by Jamie Craig on his personal blog; I was in a similar situation wanting to add LAN support to my unit. Details about this option were scarce; apparently nobody had ever taken the trouble of comparing LAN-enabled and basic units yet. Thanks Jamie !
Here are simply some notes and details on my own implementation, which I also presented in a video.
Electrical #
This was well covered in the original blog post, but I went ahead and traced all the other connections of the original IO board. I may eventually post the kicad files if there’s interest.
One initial idea was to produce a complete replacement board, but the mini-DIN connectors for the keyboard + mouse are ‘impossible’ to source now. Certainly AMP, the original manufacturer, no longer makes them. Thus one would either
- lose the ability to use external mouse/keyboard
- have to scavenge the original connectors. Annoying, since the shield pins are soldered to an inner groundplane.
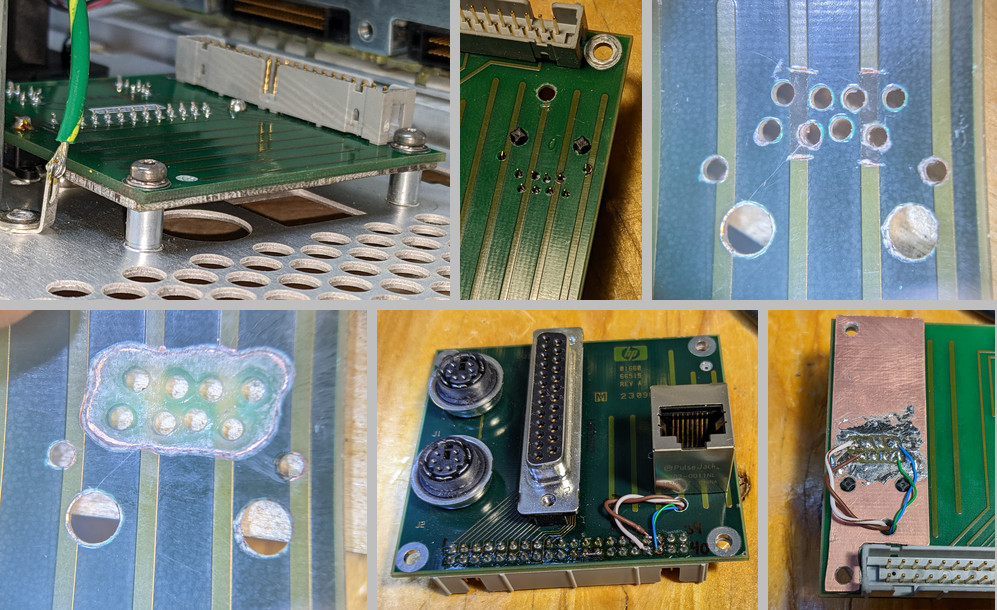
I went with a different approach: simply grafting a minimal PCB onto the original board and wire the new jack directly.
Mechanical #
8P8C connector #
I sifted through some online auction listings just to see what type of connector was originally used : nothing special, just a plastic jack that extends maybe 10mm from the rear panel.
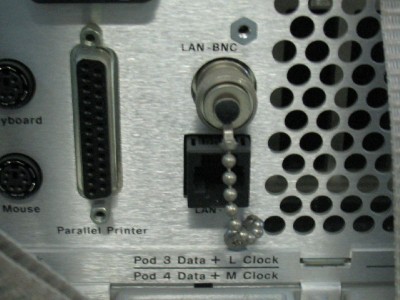
There are a handful of currently-available parts that would fit the existing panel. I wanted a “magjack” (connector with integrated transformer), to simplify the PCB; vertical mounting; and the smallest “height” possible. I chose the Pulse JXD2-0011NL which turned out fine but taller than expected.
Layout #
- I took a photo of the rear panel with a taped-on ruler for scale :
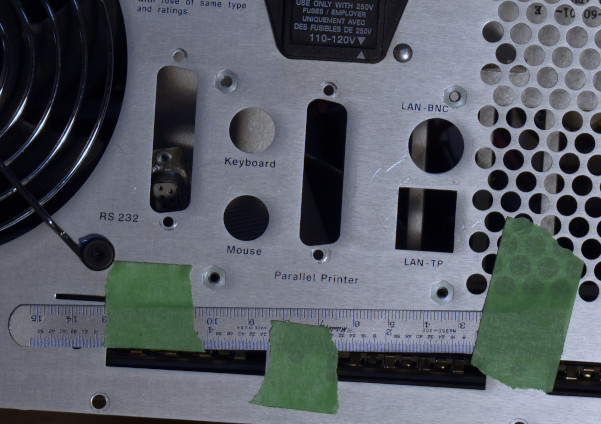
- Did a bit of GIMP magic to straighten it out, enhance the edges, and correct the scaling; then overlayed and traced the essential features in LibreCAD :
- Useless after all, but I reproduced the original layout in kicad:
- Made a smaller PCB outline, keeping only the ethernet jack and two mounting holes:
Fabrication #
In the final assembled stack, the jack pins go through clearance holes in the original PCB (making sure to cut or mill away the inner ground plane), and are soldered to the add-on PCB. With the particular Pulse jack that I used, it’s important that the add-on PCB be 1.2mm or thinner, otherwise the pins cannot be soldered.
The exact steps I followed are:
- don’t solder modpcb yet
- with orig PCB installed in machine, remove 2 of its screws where the modpcb will go
- install modpcb and re-install 2 screws to sandwich all. alignment non-critical
- mark/drill orig PCB : -8x signal pins (0.9mm) -2x shield pins (1.6mm) -2x NPTH legs (3.25mm) -1x passthrough (2.4mm)
- cut / remove copper on orig PCB to make sure no pins will short.
- important ! origpcb has an inner GND_CHASSIS layer (just below the surface, on the darker side of the PCB).
- Enlarge (or better, chamfer) the 8x signal holes to make sure they can’t short to chassis.
- optional: enlarge remaining holes in orig PCB where the rj45 pins go through, to allow some adjustment.
- remove modpcb + origpcb
- populate modpcb; keep sandwich well clamped while soldering rj45 jack. C1 optional
- connect IDC connector pins 26 and 24 together (LANOPT_DETECT)
- connect 4 wirewrap /enameled wires from testpoints T33-T36 on modpcb, through passthrough hole, to IDC pins 33-36
- optional if C1 installed : route extra wire from T26 , through hole, to IDC pin 26
Final steps #
- Install 8MB RAM stick. These are standard 72-pin SIMM modules.
- Reflash firmware - it should automatically detect the LAN option and flash the correct files (
SYSTEM.LANandSYS_032) - Tip: via RS232, copy the firmware files somewhere on the internal HDD beforehand; this avoids having to mess with unreliable and slow floppy disks.
- Refer to 1660C/CS-Series and 1670A-Series Logic Analyzers LAN User’s Guide for how to use FTP / NFS / remote X-Windows (Caution: X-windows is entirely un-secured. Those were simpler times…)
Files #
- DXF of rear panel cutout. Should be “accurate enough”.